Disclaimer : this is an updated version of the Hot Swapping guide by PiggyPiglet, updating the installation process and adding instructions for VSCode.
Hot swapping (in relation to software) refers to the process of seamlessly swapping out executing code in a live environment.
The default JVM (HotSpot) actually has support for this out of the box, albeit a severely limited implementation. You're only able to swap out method bodies, which while still better than nothing, is really not all that useful.
Thomas Wuerthinger (who you may know from GraalVM) proposed a solution in JEP 159; enhanced class redefinition. While it didn't completely solve the lacklustre hot swap implementation in HotSpot, it significantly improved upon it. The JEP proposed the ability to hot swap the following things, along with method bodies (this logic was to be untouched):
As of right now, HotswapAgent supports java 8, java 11 & java 17. Each versions has a unique installation process, which can be found over on the HotswapAgent website:
Keep the page open as you'll need it for the next step!
The setup/usage section of this guide will only cover usage in IntelliJ and VSCode. If you're using Eclipse or NetBeans, I'm fairly sure a similar setup to what follows can be achieved in both, however I do not know how to achieve it.
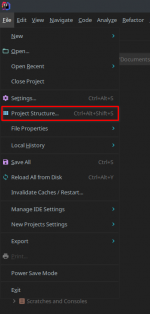
When a project is opened, you'll want to go to File > Project Structure (ctrl + alt + shift + s).
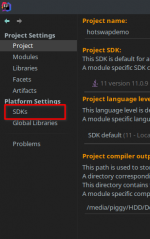
Under the Platform Settings separator on the left side panel, click SDKs.
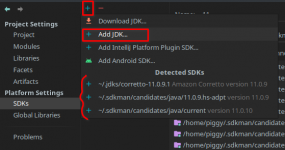
In here, we're able to add the JDK installation we made earlier. This can be done by clicking the + in the top left (alt + insert).
I recommend including "DCEVM" somewhere in the JDK name so you can easily differentiate between your regular JDK, and DCEVM.
To configure your VSCode JDKs, you'll need to go into your settings.json by triggering the following command: Preferences: Open User Settings (JSON) in Command Palette (⇧⌘P).
Then, add the following:
It should look something like this, (for version 17 on MacOS):
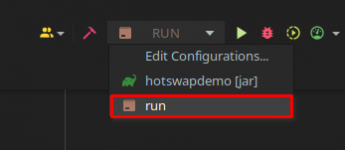
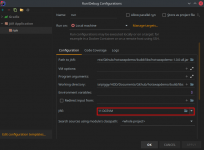
Using DCEVM from here on is relatively simple. Click your run configuration in the top right to open up an editing modal, from which you can select DCEVM as the configuration's JRE.
Depending on what java version you're targeting here, you'll need to do what is said in the Configure/Run your application section of the swapagent page of your version (opened earlier for the installation). You'll probably need to add Java flags, except for the Java 8 version.
Hit apply, ok, then run your configuration, but instead of clicking the play button (shift + f10), click the debug button (shift + f9).
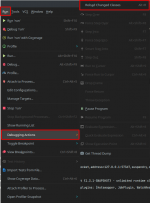
This will execute your configuration in debug mode, which will allow us to hot swap. Try change some code, you can then make it live via Run > Debugging Actions > Reload Changed Classes.
Copy the following for the launch.json file:
Then for the tasks.json file:
Depending on what java version you're targeting here, you'll need to change the "command" by following what is said in the Configure/Run your application section of the swapagent page of your version (opened earlier for the installation). You'll probably need to add Java flags, except for the Java 8 version.
Also don't forget to put the right path to your server.jar.
Start your server by starting the task you just created: open the Command Palette (⇧⌘P) and type Task: Run Task and select Start server.
Then, start debugging (F5 or the Debug menu on the right).
This will execute your configuration in debug mode, which will allow us to hot swap. Try change some code, you can then make it live by clicking the ️ button on the debug menu.
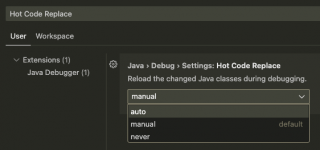
If you want to go even further, you can Hot Code Replace automatically on save, to do that go to your settings and search for "Hot Code Replace", then select "auto" in the dropdown menu.
 ️ Hot Swapping Guide
  ️
️
 ️ Hot Swapping Guide
  ️
️ Info
Info
Hot swapping (in relation to software) refers to the process of seamlessly swapping out executing code in a live environment.The default JVM (HotSpot) actually has support for this out of the box, albeit a severely limited implementation. You're only able to swap out method bodies, which while still better than nothing, is really not all that useful.
Thomas Wuerthinger (who you may know from GraalVM) proposed a solution in JEP 159; enhanced class redefinition. While it didn't completely solve the lacklustre hot swap implementation in HotSpot, it significantly improved upon it. The JEP proposed the ability to hot swap the following things, along with method bodies (this logic was to be untouched):
- Adding/removing methods
- Adding/removing static and instance fields
- Adding supertypes
 Install
As of right now, HotswapAgent supports java 8, java 11 & java 17. Each versions has a unique installation process, which can be found over on the HotswapAgent website:Keep the page open as you'll need it for the next step!
 Setup
Setup
The setup/usage section of this guide will only cover usage in IntelliJ and VSCode. If you're using Eclipse or NetBeans, I'm fairly sure a similar setup to what follows can be achieved in both, however I do not know how to achieve it.IntelliJ
As far as I'm aware, it's not possible to configure IntelliJ's SDKs without having a project open, so you'll need to open a project to find the following option, or even create a new project for the express option of configuring the following.When a project is opened, you'll want to go to File > Project Structure (ctrl + alt + shift + s).
Under the Platform Settings separator on the left side panel, click SDKs.
In here, we're able to add the JDK installation we made earlier. This can be done by clicking the + in the top left (alt + insert).
I recommend including "DCEVM" somewhere in the JDK name so you can easily differentiate between your regular JDK, and DCEVM.
VSCode
To configure your VSCode JDKs, you'll need to go into your settings.json by triggering the following command: Preferences: Open User Settings (JSON) in Command Palette (⇧⌘P).
Then, add the following:
JSON:
"java.configuration.runtimes": [
    {
        "name": "JavaSE-VERSION", // replace version by 8, 11 or 17
        "path": "/path/to/the/installed/jdk"
      },
]
It should look something like this, (for version 17 on MacOS):
Note: You can set one of them to default by adding "default": true to the entry. The default JDK will be used for your unmanaged folders (without build tools).
 ️ Usage
IntelliJ
Prerequisites:- A project in IntelliJ
- A run configuration for said project (minecraft, standalone)
Note: I recommend also configuring your build tool to automatically output the jar in your run configuration's working directory. Instructions on how to do that with gradle are here.
Using DCEVM from here on is relatively simple. Click your run configuration in the top right to open up an editing modal, from which you can select DCEVM as the configuration's JRE.
Depending on what java version you're targeting here, you'll need to do what is said in the Configure/Run your application section of the swapagent page of your version (opened earlier for the installation). You'll probably need to add Java flags, except for the Java 8 version.
Hit apply, ok, then run your configuration, but instead of clicking the play button (shift + f10), click the debug button (shift + f9).
This will execute your configuration in debug mode, which will allow us to hot swap. Try change some code, you can then make it live via Run > Debugging Actions > Reload Changed Classes.
For productivity purposes, I highly recommend assigning a keybind to this action. As you can see from that screenshot, I personally chose alt + r.
VSCode
Prerequisites:- A project in VSCode
Copy the following for the launch.json file:
JSON:
{
    "version": "0.2.0",
    "configurations": [
        {
            "type": "java",
            "name": "Bukkit", // you can put anything here
            "request": "attach",
            "hostName": "localhost",
            "port": 1000 // choose any port here, but put the same in tasks.json
        }
    ]
}
Then for the tasks.json file:
JSON:
{
    "version": "2.0.0",
    "tasks": [
        {
            "type": "shell",
            "label": "Start server",
            "command": "java -agentlib:jdwp=transport=dt_socket,server=y,suspend=n,address=1000 -jar /path/to/your/server.jar nogui", // Change this line! (See below)
            "problemMatcher": []
        }
    ]
}
Depending on what java version you're targeting here, you'll need to change the "command" by following what is said in the Configure/Run your application section of the swapagent page of your version (opened earlier for the installation). You'll probably need to add Java flags, except for the Java 8 version.
Also don't forget to put the right path to your server.jar.
Start your server by starting the task you just created: open the Command Palette (⇧⌘P) and type Task: Run Task and select Start server.
Then, start debugging (F5 or the Debug menu on the right).
This will execute your configuration in debug mode, which will allow us to hot swap. Try change some code, you can then make it live by clicking the
 ️ button on the debug menu.
If you want to go even further, you can Hot Code Replace automatically on save, to do that go to your settings and search for "Hot Code Replace", then select "auto" in the dropdown menu.
Last edited:


